Autodock 4.0 can be found from the following website,Installation:
I.windows installation:
1.Double click on to the MGLTools setup file.
2.Click "Next"
3.Accept the license agreement
4. Select your favorite destination folder to install the files and click 'Next"
5. wait for a while for the files to get installed
6. click on to the "Non commercial-Install all these packages"
7. click on to each package license
8. click "continue" button below
9. If you wish to launch shortcuts on your desktop , you can just click "finish"
10. And there your are ---- you can start working.
II. Linux installation:
NOTE: Autodock need to install from /root/, it can be installed from the /home/ directory itself.
1. Download MGLTools-1.5.2-Linux-x86-Install grant execute permission and run the installer.
To grant execute permission, type the following command at a command prompt: chmod +x MGLTools-1.5.2-Linux-x86-Install .
You can also use file manager to grant execute permission (right-click on the downloaded file and select Properties).
2) In the install wizard, click Next, select the destination and click Next again.
The default destination is /usr/local/MGLTools-1.5.2 for the root user and $HOME/MGLTools-1.5.2 for all others.
Please wait a few moments until the "License Agreements for add-on packages" window appears.
3) Complete the "License Agreements for add-on packages" form.
See Filling add-on packages license form for details.
4) Finally, click Finish to complete installation,
The README file contains detailed information on how to setup your environmental variables for command line usage.
Meanwhile download the following as well,
click on the above link,
you will pop up with an registration form, kindly fill with necessary details and download the files which will be compatible to your operating system that your using.
This will contain 2 executable files,
1. autogrid
2.autodock.
NOTE: Make sure you install everything in the same destination folder including the 2 executable files
How to work on Autodock 4.0?
Here we go..!!
Follow the below steps,
*double click on to this icon

Your workspace will look like this,
 ,
,Kindly use the pdb and ligand files which comes along with the installation of Autodock 4.0, will be present in (MGLTools/MGL ToolsPckgs/Pmv/doc). Use hsg1.pdb (protein) and ind.pdb (ligand)Protein Preparation: File - Read Molecule - Open the file.pdb. Select - Select from string - Type HOH* (to remove water molecules)Edit - Add Polar only File - write PDB save ur file in pdbfile.pdb extension just without changing the path. just click and remove HETATM Click sort nodes before saving .
Ligand Preparation: Ligand - input open ur ligand.pdb - just note down the summary of the ligand. Torsion tree - choose root again go to torsion tree - detect root again go to torsion tree - show root expansion again go to torsion tree - choose torsions just click ok again go to torison tree - set number of torsions give the number of torisons that you get in the summary of the (TORSDOF) when u open the ligand. Output Save the ligand file in the same directory in ligandfile.pdbqt
Grid preparation: Select select from string just type your active site residues and then click ok Flexible residues - input macromolecule - choose macromolecule - click on your pdb from the panel displayed. Flexible residues - choose torsions from the currently selected residues - active site residues alone will be highlighted. Flexible residues - redisplay the macromolecule Flexible residues - save the files in both flexible as (pdbfile_flex.pdbqt) rigid as (pdbfile_rigid.pdbqt) .Grid - macromolecule - open- just open ur pdb_rigid.pdbqt file, ignore the warnings, if you have any metal ions in your proteinn , just open ur grid file and u can find (0.00) for ur metal ions, just find the valency for them from net and type maunally ther and again save it.you use this now. (if you dont hav metal ions), just ignore the warnings. set map types - choose ligand - click on ur ligand from the panel displayed output - save in .gpf edit gpf - dontt do anything just click ok for the time being Run - run autogrid just browse and locate ur autogrid.exe file , just browse and locate file .gpf (grid parameter file) and note that everything should be in the same directory, were you saved your pdb in protien preparation, dont change the path for your wish, just save were it is saving just put your autodock.exe and autogrid.exe in the same directory were ur files has been saved
Docking: Docking - Macromolecule - set rigid file name - just again open ur pdb_rigid.pdbqt file Ligand - choose ur ligand search parameters- just delete one zero from the 2500000 (just make it to 4 zeros), otherwise it wil take very long time. Docking parameters- default other option-autodock 4 parameters- default output - save in ligandfile.dpf Edit DPF - just leave and click ok Run - run autock just browse and locate ur autodock.exe file just browse and locate file .dpf (dock parameter file) and then click ok.
Analysing the results:open the widget "Analyse" and click open, locate the ligand.dlg file,Next click on to Macromolecule found below Dockings, just click open, it will open by default, if you cannot able to view your protein properly, simply press "N" button from the keyboard.
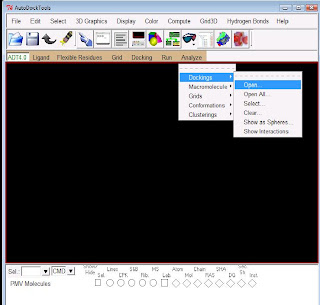

To view your results click on to conformations -play,
 It will open a widget shown in the picture.


click on to the ampersand (&) symbol.
 Analyse your results..!!
NOTE: kindly save all your files in the same folder where you have been installed your MGLTools and executable files, if you want to run the programme from your favourite folder of your choice, make sure that you place just the executable files alone in the place were you have saved your all files that you have been used during the course of working on Autodock, because without these executable files the programme wont run properly.
For more details regarding the algorithm,f orcefields and interpretation of the data kindly go through the Autodock manual which is available at below mentioned web site, http://autodock.scripps.edu/faqs-help/tutorial/using-autodock-4-with-autodocktools

it define fine but some less information available here
ReplyDeletehi.....
ReplyDeletei understand the process but.but i want to know there having any use of cmd.if yes than why?
please say more about result
ReplyDeleteDear Ms.Jimmy,
ReplyDeleteYes I do agree that, the information provided could be less, but still I felt this would be a starting point for the beginners to understand the basic concepts to work on.
Too much of information may sometimes bother the freshers who want to use this software. But I am always here to help you out. If you can be more specific in your query, it would be easy for me to provide more information on Autodock.
Dear Anonymous,
ReplyDeleteI am totally ignorant of using 'cmd' for Autodock.
But I have used cygwin (which gives linux like environment in windows), useful for screening large library of drug-like molecule.
Screening a large library is much efficient and faster in cygwin command line when compared to the graphical user interface (GUI) of this software.
Did I answered you question.
Coming to the results section. There are quite a ways to interpret which depends on what you are looking at. So could you be more specific in what kind of results you are asking for?
Thanks!
Roopa
I cant do in windows plz tell me how i run????
ReplyDeletein the said process it shows error.
Dear G2,
ReplyDeleteMay I know what type of error you get?
Please mail me a snap shot of the error to roopa.nus@gmail.com
Thanks!
Roopa
where will be dock scores visible for the protein ligand interation?
ReplyDeleteDear,
ReplyDeleteIn order to view the dock scores, follow the steps below,
1. under the menu bar 'Analyse' - click 'Dockings' open the ligand.dlg file.
2. under the same 'Analyse' menu bar - now click open the 'Macro molecule' (.pdbqt) file.
3. now again under 'Analyse' - click 'Conformations' and click 'Play'. A dialogue box opens. Click the "&" ampersand symbol and click on 'show info' and 'Build hydrogen bonds' and you should see hydrogen bonds highlighted in yellow dotted lines whichever that interacts with your protein.
Still if you are confused, please send me your email id to my mail at roopa.nus@gmail.com, i will send you some screen shots of it for your better understanding.
Thanks,
Roopa