Wednesday, August 19, 2009

29) Removing sequences that are fully gapped from alignment using BioEdit

Let’s say you have an alignment that looks like this after you cleaved out a particular region from a longer protein:
We intend to remove sequences that are fully gapped, as shown in red box above.

To do this,
  1. Click on: Sequence >> Filter out sequences containing certain characters >> Cut them to new alignment

  2. Select Contain non- and type “-“ in the textbox.
    This means we are asking the tool to extract any sequence that contains a non-gap character.

  3. The sequences that are not fully gapped will be extracted to a new alignment, preserving the order of the sequences in the original alignment.
  4. Save the output as a new .aln file, and you’ll have an alignment file without the fully gapped sequences!

Wednesday, July 29, 2009

28) How to import tab delimited data into a table of a mySQL database in proline server???

Steps to import a tab delimited data:

1) Prepare your tab delimited data. Make sure that there are no headers included on the first line. File transfer in the data to proline either by WinSCP or SSH.

2) Create a table in the mySQL database in proline. Make sure that the imported data would match to the column headers that you have defined in the table respectively.

For example, "D1_00001" in my data would match to "Accession" column that I have defined in my SQL table.


3) Login to proline and SQL. (refer to previous posts 2 and 23)

4) Use the following SQL command:

LOAD DATA LOCAL INFILE 'file_with_full_pathname' INTO TABLE name_of_table

For example:

mysql> \g LOAD DATA LOCAL INFILE '/projects/denvdb/www/DENV.txt' INTO TABLE DENV


It will work even though I did not specify that the data is tab separated.

Please refer here for more information.

For comma delimited data, the sql command is the same except that you may need to add in FIELDS TERMINATED BY ','

However I have not tested this out yet.

Wednesday, June 10, 2009

27) How to create a metadata file for AVANA???

In order to do mutual information analysis (e.g in post 25), we need to create a metadata file:

a) Create a blank excel sheet.

b) Paste your GI numbers correspondingly to the first column of the sheet.

c) In the second column, insert the serotype matching with the corresponding gi numbers.

d) In the third column, insert the protein name matching with the corresponding gi numbers.

e) Make sure that you include headers in the first row or AVANA will treat the first data as a header, thus missing out 1 data in your analysis.

f) Once all the data is in, save the spreadsheet as a comma-separated file by changing "Save as type" to "CSV (Comma delimited)".


This is a sample metadata of my dengue virus records with capsid protein entries for all serotypes, which i named as "All_C.csv". The pictures show the start and the end of the sheet respectively.

26) How to convert an alignment file (.aln) to a taln file (.taln) for use in AVANA.

It is important to note that the Antigenic Variability Analysis tool (AVANA) do not recognise a normal alignment file (.aln), and we need to convert it to a .taln format in order to do entropy or mutual information analysis. These are the steps to do it:

a) Open the aln file in BioEdit. Make sure that the misalignments have been corrected.

b) Click File\Export\tab-delimited text (title.tab.sequence)


c) Change "Save as type" as "All Types", and name the file. Make sure to add ".taln" at the end of the filename, and save it to anywhere you want in your desktop.


d) [ CAUTION! ] Open the ".taln" file in a text editor, scroll to the bottom of the page and delete the last line that shows the consensus sequence symbols. AVANA may or may not run when the input file contains these consensus symbols, however, the calculations reported by AVANA would be off by 1 as it would count the last line as an additional sequence.

Friday, June 5, 2009

25) Steps for obtaining mutual information between two sequence alignments in AVANA:

Steps for obtaining mutual information between two sequence alignments in AVANA: (e.g comparing D1_C to D2_C,D3_C,D4_C):


1) Load your taln file (e.g. All_C.taln) in AVANA


2) Load your metadata (e.g. All_C.csv) in AVANA


3) Go to Alignment\Create Subset

4) In the window, Source Alignment: Master Alignment, choose DENV1 as serotype and C as protein, and give a name to the subset (e.g. DENV1_C)


5) Create the next subset by repeating step 4, but this time highlight the rest (DENV2,DENV3 and DENV4) as serotype, and give another name to the subset (e.g.DENV234_C)


6) Check that the sample size is 9 by going to Tools\Preferences. It will scan for peptides of length 9 which is the typical length of t-cell epitopes.

7) In the same window, under the "Comparisons" tab, tick "Estimate average mutual information" and set the MI threshold to 1.000 (ideally we want value of 1, if get nothing then we consider other thresholds).


8) Next, go to View\Compare two alignments.

9) Click DENV1_C as top alignment and DENV234_C as bottom alignment


10) You will see two graphs. Go to View\Show Mutual Information and View\Show sequence logo.

11) The green line in the graph shows the mutual information. MI value tells u what is characteristic in one alignment when compared to the other alignment. MI value of 1 means, it is seen in this alignment, but was not seen in the other alignment.

12) Click on the position numbers to your left to see the sequence logo, which shows conservation and all the peptides at that position.

13) Export your results by going to View\Statistics\Diversity and save as .txt. Create an excel sheet for better viewing. Sort them according to descending MI, then increasing entropy.

Tuesday, June 2, 2009

24) Summary steps in activating LAN connection in VMWare if problems still occur after post 22

Comment by Jean:

Summary steps in activating LAN connection in VMWare if there are still problems in connecting online (after post 22):

a) lspci -vvv and ifconfig -a (display output below, checking what hardware the VMplayer is running from)


02:01.0 Multimedia audio controller: Ensoniq ES1371 [AudioPCI-97] (rev 02)
Subsystem: Ensoniq Creative Sound Blaster AudioPCI64V, AudioPCI128
Control: I/O+ Mem+ BusMaster+ SpecCycle- MemWINV- VGASnoop- ParErr- Stepping- SERR- FastB2B- DisINTx-
Status: Cap- 66MHz- UDF- FastB2B+ ParErr- DEVSEL=medium >TAbort- TAbort- SERR- Latency: 64 (1500ns min, 63750ns max)
Interrupt: pin A routed to IRQ 19
Region 0: I/O ports at 2080 [size=64]
Kernel driver in use: ENS1371
Kernel modules: snd-ens1371

02:02.0 USB Controller: VMware Inc Abstract USB2 EHCI Controller (prog-if 20 [EHCI])
Subsystem: VMware Inc Abstract USB2 EHCI Controller
Control: I/O- Mem+ BusMaster+ SpecCycle- MemWINV- VGASnoop- ParErr- Stepping- SERR- FastB2B- DisINTx-
Status: Cap- 66MHz- UDF- FastB2B- ParErr- DEVSEL=fast >TAbort- TAbort- SERR- PERR- INTx-
Latency: 64 (1500ns min, 63750ns max)
Interrupt: pin A routed to IRQ 16
Region 0: Memory at e8900000 (32-bit, non-prefetchable) [size=4K]
Kernel driver in use: ehci_hcd

eth1 Link encap:Ethernet HWaddr 00:0c:29:bf:37:04
BROADCAST MULTICAST MTU:1500 Metric:1
RX packets:0 errors:0 dropped:0 overruns:0 frame:0
TX packets:0 errors:0 dropped:0 overruns:0 carrier:0
collisions:0 txqueuelen:1000
RX bytes:0 (0.0 B) TX bytes:0 (0.0 B)
Interrupt:18 Base address:0x2024

lo Link encap:Local Loopback
inet addr:127.0.0.1 Mask:255.0.0.0
UP LOOPBACK RUNNING MTU:16436 Metric:1
RX packets:210 errors:0 dropped:0 overruns:0 frame:0
TX packets:210 errors:0 dropped:0 overruns:0 carrier:0
collisions:0 txqueuelen:0
RX bytes:424561 (414.6 KiB) TX bytes:424561 (414.6 KiB)


b) dhcpcd -k eth1 (kill eth1)

c) ifconfig eth1 up (restart eth1)

d) dhcpcd -nd eth1 (do dhcp call and look for packet advertising the network server from the host, and if found, it will assign an IP address to eth1.)

e) ifconfig eth1 (check that eth1 has an ip now)

23) How to use MySQL in Proline???

This is a simple tutorial on how to use mySQL commands in Proline.

a) Firstly, log in to the server using putty.exe in Windows or SSH in BioSLAX using your username and password. (See post 2 if you have forgotten how to login through BioSLAX)


b) Next, log in to mysql (it may be a different username and password). See the screenshot below. You will directly enter the database denvdb.


c) Before proceeding, type "\h"(help) to take note of important commands required for navigation through mySQL. See the screenshot below:


Some important commands are:

1) \g, \G : type either of these commands to send an SQL query to the server. \G displays results vertically.

Example: \g SELECT * FROM DENV (display all data in the table DENV). Note that you need to enter the same command twice. See the screenshot below:


2) \c : Clear cache. After an SQL query, use this command if you want to enter another query.


3) \q: Quit mySQL to log back to proline.


Notes:

For uploading a table with data to mySQL, you can use the method on post 4. Otherwise, you can create an empty table with just your fields in the columns using the CREATE keyword. Note that there are many keywords to use in mySQL. You can refer to here for more tutorials on mySQL.


Two keywords that may be important are:

a) Syntax for changing the data types of a column:

ALTER TABLE table_name MODIFY column_name type

Example: \g ALTER TABLE Registration MODIFY contactno INT(10)


b) Syntax for showing column fields, data type, field attributes, primary key and other information in a table:

SHOW columns from table_name

Example: \g SHOW columns from DENV

Tuesday, May 19, 2009

22) How to fix your internet connection in BioSLAX VMWare

This tutorial is for those who when after booting up their BioSLAX VMWare find that the internet is not working. For example, you ran Firefox and could not access any website, or ping any site through the Konsole, or could not get the "Wireless Assistant client" to assist you (it returned "No usable wireless device found, wireless, Wireless Assistant will quit now"). You can try the steps listed below to solve this problem:

1. Select the "Bridged" network adaptor (select from the Devices menu on top of the screen) if you are using wired internet. For wireless internet, use the "NAT" adaptor, which forces the virtual machine to talk to the network address card of the host machine, so that the host acts as a router.

2. Type the following in the Konsole to check if your dhcp client is up and running

ps -ef | grep dhcp


# This check the process (ps) number of the dhcp, and if it is running it will be shown as one of the processes. If you have two or more dhcp processes, choose the one corresponding to eth1 if wireless network is desired or eth2 for wired network.

3. If the dhcp is running, kill it to reset things. For example,

kill -9 4663


# Assuming 4663 is the process number of the eth1 dhcp that is to be terminated.

Note: You can kill dhcp and bring down the interface for various interfaces using "dhcpcd -k ", e.g.

dhcpcd -k eth1 or dhcpcd -k wlan0


There is no need to do ps -ef and killing of the process.

4. After killing the dhcp, you want to check whether the eth1 or 2 card is being recognized by BioSLAX. Type

ifconfig -a


# If the interface card (eth1 or 2) is listed, along with the loop back, this means that the eth1 (or 2) card is recognized by Bioslax. Now, to check whether the eth1 (or 2) card is up and running, type

ifconfig


# If you only see loop back, then it means that your eth1 (or 2) card is not running. You need to start the eth1 (or 2) by typing

ifconfig eth1 up


# Change eth1 to 2 if you want to up eth2
# If desired, you can bring eth down in the same manner

5. Once the eth1 (or 2) is up and running. You need to start the dhcp. Type

dhcpcd -nd eth1


# This will do dhcp call and look for packet advertising the network server from the host, and if found, it will assign an IP address to eth1. When successful, the connection established will pop up, courtesy of the BioSLAX GUI.
# For eth2, change eth1 to 2

You are done!

Summary code

1. dhcpcd -k eth1
2. ifconfig eth1 up; dhcpcd -nd eth1


Note
If you are not running bioslax with persistence change saving mode, you will need to redo this step every time you reboot BioSLAX.

Wednesday, May 13, 2009

21) How to do multiple sequence alignment using MUSCLE

MUSCLE is an alternative to ClustalX or W to construct a multiple sequence alignment (MSA). MUSCLE is particularly good at handling large number of sequences for MSA and produces better quality alignments when numerous short partial sequences are present in the input fasta file. Below are the steps to run MUSCLE alignment using the command prompt:

1. Create a new folder on your computer and download MUSCLE to this folder from

http://www.drive5.com/muscle/downloads3.6/muscle3.6_win32.zip

2. In the same folder paste a copy of your input sequences to be aligned.

3. Now, follow the instructions below to run MUSCLE using the command prompt (Start-> All Programs -> Accessories -> Command Prompt; note that the procedures below for the command prompt are all case-sensitive, so make sure you type carefully!)

4. Now, navigate the command prompt to the folder you just created for MUSCLE alignment. Here are some tips to help you move around in the command prompt:

- to go one folder level backward: cd..
- to list content of director/folder: dir
- to go one folder level forward: cd

5. Once you have navigated to the folder, type “muscle –in –out ” to perform the alignment.


6. Close the command prompt when the alignment is complete.

Note: The output file is in “afa” format, which is not suitable for subsequent analyses by other programs. Therefore, you should convert it to the popular “aln” format. To do this, load the output file into ClustalX and then click on File -> Save Sequence as -> under format, select “Clustal format” -> under “Save Sequence As” at the bottom, change the name of the file extension from “output_file.afa” to “output_file.aln” -> click on the OK button.


Content by: Sye Bee & Asif M. Khan
Posted by: Sye Bee
Edited by: Asif M. Khan

20) How to use Blastclust to identify representative sequences

A situation where this may be applicable is when you have too many sequences and you want to do a quick analysis by using a set of sequences that represent all the sequences that you have. For example, you have a dataset of 1000 sequences of length 600 amino acids each and you would like to do phylogenetic analysis on them using Neighbor joining algorithm. However, because of the large input dataset, it will be few days before you get your results. So, in this case, you could choose to just analyse sequences that represent all your 1000 sequences. Follow the steps below to get your representative sequences:

1. Go to http://toolkit.tuebingen.mpg.de/blastclust


2. Load your input sequence file and set the length to be covered to 100%, and the percent identity to 90% or to any other desired threshold.


3. You may either wait for the results to appear or wait for an email about the results from the server


4. Here is an example of the results


5. Save the resulting output (representative sequence fasta file), by clicking on the “save” button on the "Results" bar, and save your file with a “.Fasta” extension.


6. Check the unique representative fasta file by opening it in a text editor.
The file may look weird in Notepad, use Wordpad instead or get a good text editor,
such as Editplus or Notepad++, among others. You are done!


Content by: Asif M. Khan & Sye Bee
Posted by: Sye Bee
Edited by: Asif M. Khan

19) How to remove duplicate sequences from a fasta formatted input file

===Update: 21 March 2011===

For a more comprehensive and updated information on this, please see Post 32.
Read all the way to the end of that post.

======================

You can use Jalview to easily check for duplicates and remove them if any.

1. Download and install Jalview on your home system from

http://www.jalview.org/download.html


2. Run Jalview and close all example windows


3. Load your fasta file to Jalview


4. Remove duplicates:

- Select all sequence

- Go ‘Edit’ to uncheck the pad gaps function.

- In ‘Edit’, select ‘Remove all gaps’

- After that select ‘Remove redundancy’

- At the “redundancy threshold selection” dialog box, set the threshold value to 100, click ‘Remove’.


5. Saving the unique fasta file and you are done!


Content by: Asif M. Khan & Sye Bee
Posted by: Sye Bee
Edited by: Asif M. Khan

18) How to shorten the description line in fasta format to just include GI number

Some of the software like Phylip or Clustal (version 1.6) truncate the description line and only take the first 10 characters. This may result in duplicate description lines in your input sequence file. You could choose to just have the GI number in the description in order to avoid this problem as it has a maximum of only 9 characters. Follow the steps below to achieve this:

1. Open the Fasta formatted input file in MS Excel


2. Select column A and click on “Ctrl+H” for the replace function

3. You have to replace “gi|” with nothing, follow the steps below:

a. Under “Find what”, type “gi|”, and leave “Replace with” blank

b. Click on “Replace All”


You will see this upon successful replacement:


4. Next, replace everything after the “|” symbol with nothing:

a. Under “Find what”, type “|*”, and leave “Replace with” blank

b. Click on “Replace All”


Output upon successful replacement. Now you only have the GI numbers left:


5. Save the file by clicking on the Save icon or “File” à “Save”

6. Click on “Yes” when the warning prompt pops-up


7. Close Excel

8. Ignore the prompt that pops-up by clicking on “No”


9. Open your fasta file in Notepad to check whether only the GIs are left on the description line, if yes, you are done!


Content by: Asif M. Khan & Sye Bee
Posted by: Sye Bee
Edited by: Asif M. Khan

Monday, May 11, 2009

17) Installing BioSLAX as a full Linux system to your hard drive

Follow the instructions below to install BioSLAX (see post 9) as the second Operating System (OS) on a system preinstalled with Windows OS and to configure the dual boot option when booting the computer. We do not guarantee that the steps below will work fine on your system, though we had no problem implementing them on ACER Extensa 4620. So, follow the steps below at your own risk.

1) Boot up with the latest BioSLAX DVD with all the fixes.

2) When it boots up into KDE, from the KDE menu, under system, you should find the "GParted Partition Editor".

3) Use the partition editor to unmount the hard disk that you want to resize (right click -> Unmount) (Figure 1). Select “Do Nothing” when a KDE daemon pops up. Drag the hard disk to resize the partition, so that there is at least 4 Gb (about 4,000 MiB) of free hard disk space for the installation of Bioslax (Figure 2 & 3). Right click on the empty partition created and click “New” (Figure 4). Then, format the new hard disk partition to ext3 (Figure 5). Ignore the KDE daemon that pops up asking if you want to mount it again - click "Cancel".
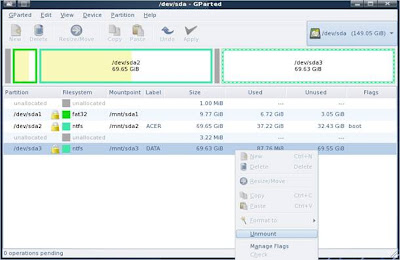

Figure 1: Unmounting /dev/sda2/
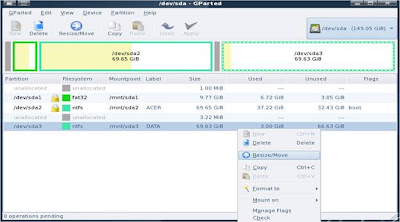

Figure 2: Resizing /dev/sda2/
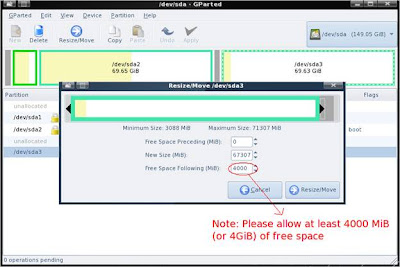

Figure 3: Defining the new size of /dev/sda2
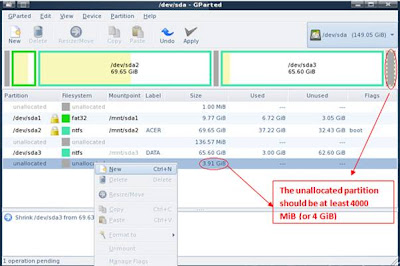

Figure 4: Creating a new partition in your hard disk
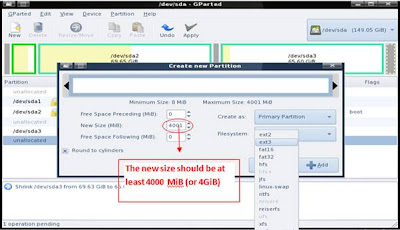

Figure 5: Formatting the new partition as ext3
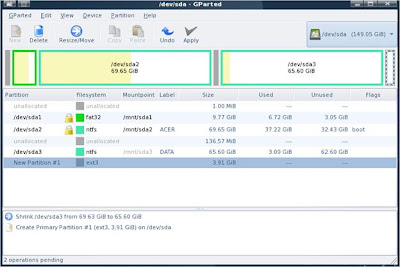

Figure 6: Applying changes to the hard disk

4) Click on “Apply” at the top bar of the partition editor to apply your changes (Figure 6). This may take 2 – 3 hours.

5) If the filesystem indicates that the new partition is unformatted, right click on the empty partition and format it to ext3.

6) Re-mount the hard disk by right clicking and selecting "Mount on" (should be mounted to /mnt/sdaX or /mnt/hdaX depending on whether it’s a sata or ide disk). If there is no selection for mounting, close and reopen Gparted Partition Editor, and try again.

7) Go to the KDE menu, under BioSLAX for the BioSlax installer (Figure 7).
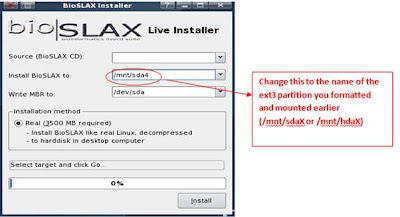

Figure 7: BioSLAX Installer

8) Leave the "Source" as whatever it shows (can be blank), the "Install BioSLAX to" should be the partition you formatted and mounted earlier in step (4), "Write MBR to" should be /dev/sda or /dev/hda depending on the type of disk you formatted ealier (sata or ide).

9) Click “Install” and wait for it to finish. This may take 10 – 15 minutes.

10) Reboot and you should see the lilo screen for about 2 seconds before it boots into Bioslax. Login with username: root and password: bioslax. Type “startx” in the command screen to switch from command mode to graphical mode, “reboot” to restart the computer and “init 0” to shut down the computer.
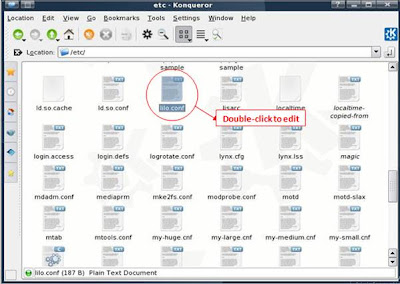

Figure 8: Locating /etc/lilo.conf

11) To enable dual booting at the lilo screen, boot up Bioslax and add these lines to the end of the /etc/lilo.conf (Figure 8):
# windows
other = /dev/hdaX (or /dev/sdaX if it’s a sata disk)
label = Vista
where hdaX is the partition where windows is.
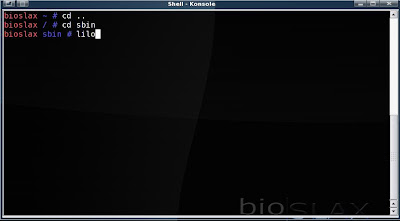

Figure 9: Running /sbin/lilo on Konsole

12) After that, start up Konsole and run /sbin/lilo to reread the config and reboot (Figure 9). You should see 2 choices there for about 2 seconds. Change the timeout in /etc/lilo.conf from 20 to 50 or 100 to get 5 or 10 second delays instead of just 2 seconds. If you want it to default boot to Vista instead of BioSlax then add the following line after the "vga=.." line :
default=Vista
Note: Whatever changes you make to the /etc/lilo.conf, make sure to run /sbin/lilo to reread them.


Content by: Jean, Benjamin, Mark and Kuan Siong
Posted by: Sye Bee & Asif M. Khan

Saturday, May 9, 2009

16) LAPIS: Fasta formatting a list of sequences

Let's say you have a list of sequences (one sequence per line) downloaded from a databases and you would like to FASTA format the list. To quickly do this, follow the steps below.

1. Copy and paste the list to an excel sheet
2. Insert a new column before the sequence list column
3. In the new column enter number 1 in cell 1 and number 2 in cell 2, and then to auto fill the numbers in the rest of the cells, you highlight cell 1 and 2 and click-drag the right bottom corner of the second cell to the last cell of the list
4. Copy the two columns to LAPIS as a new file
5. Activate the simultaneous editing mode
6. On the first line, click in between the description portion and the sequence portion of the line. E.g. place and click the cursor after the number "1", which is just before the sequence
7. Hit the enter button. This will move the sequence portion below the description portion in a new line. Thanks to the simultaneous mode, this will be automatically done for the rest of the sequences
8. There might be extra leading spaces before the sequence. So, to remove them, click at the beginning of any one of the lines containing the sequence. Then, click on the delete button until all the leading spaces are gone. Thanks to the simultaneous editing mode, all the leading spaces in all the other sequences will also be removed.
9. Save the file as a text file. You are done


Posted by: Asif Khan

Friday, May 8, 2009

15) General steps that you need to do after transferring the webpages from localhost to another server

These are steps that you need to do after transferring your webpages (e.g. DENVDB webpages) from localhost to another server (e.g. proline):

a) Edit the config.inc.php (change the username, password and database name if required, dbhost remains the same [localhost])
b) Export the DENV table from localhost SQL and import into proline SQL (using post 4 of bioinfotutlets)
c) Setup wwwblast in Proline (using post 7 of bioinfotutlets)

14) How to convert a phylip file to an alignment file

To convert a phylip file to an alignment file:

a) Open the phylip file in BioEdit
b) Go to File\Export\Sequence Alignment
c) Select as type: ClustalW 1.8 (*.aln), name your file and save!!!
d) Since this approach does not provide the sequence conservation line (*, : or .) in the aln file generated, you re-save the file in the aln format using ClustaX: i)Open the aln file from c in ClustaX, ii) File --> Save Sequence as --> Select "CLUSTAL format" under format --> Click on the "OK" button. Now you should be able to see the sequence conservation line.

13) How to create a bootable (e.g. BioSLAX) USB thumbdrive

First, format your USB thumbdrive as a FAT or FAT32 filesystem using your Windows format utility. Note that the thumbdrive you use must be of capacity 1 GB and above.

Using any software that can extract files from an ISO (eg. Magic ISO, WinISO or WinRAR), extract the contents of the operating system (OS, such as BioSLAX) ISO into your USB thumbdrive. Alternatively, you can copy and paste the boot and bioslax folders from your Bioslax Live DVD/CD to your USB thumbdrive directly. You will find 2 directories in your thumbdrive, namely boot and bioslax.

Using a DOS command prompt (Windows Start button, click Run, then type in “cmd” without the quotes into the textbox and hit enter), CD to the boot directory. Now run the file called bootinst.bat. (You can also double click on bootinst.bat in your USB directory in file explorer). It will show you the following text :


Where %DISK% is the drive letter of your USB thumbdrive. Hit any key make your USB thumbdrive bootable.

IMPORTANT! A bootable USB thumbdrive will only work if the machine you are booting from supports booting from external USB devices. If it does not, the machine will not recognize the thumbdrive as bootable and will not boot BioSLAX from it.


Content by: Mark De Silva, Lim Kuan Siong, Tan Tin Wee

Posted by : Sye Bee & Asif M. Khan

Edited by : Sye Bee & Asif M. Khan